
How To Install Keepalived on Ubuntu 24.04

Keepalived is one of the routing software for high avaibility on Linux. Keepalived uses VRRP (Virtual Router Redundancy Protocol).
We need at least 2 servers to make Keepalived run, server1 as MASTER and server2 as BACKUP. When server1 is not working then server2 becomes MASTER and handles all requests and if server1 comes back online then server2 becomes BACKUP and server1 becomes MASTER again.
This experiment we will use DigitalOcean Droplet
Required:
- 2 Droplets with Ubuntu OS
- Floating IP / reserved IP
- DigitalOcean API key
Details of the resource we are using as an experiment
- Reserved IP 134.209.131.225
- server1
- IPv4 Public 68.183.104.161
- Private IPv4 10.116.0.3
- Server ID: 473762516
- server2
- IPv4 public 142.93.251.250
- IPv4 private 10.116.0.2
- Server ID : 473762517
- DigitalOcean API key: dop_v1_2ecff269c49c10f7df5a02bee8f7ee85bd14ec0352ade4538602a8ffb0d69dxx
Install Keepalived on both servers
sudo apt update && sudo apt upgrade -y
sudo apt install keepalived -y
Create a script to move the reserved IP
This script is used for calling the API to move the reserved IP from server1 to server2 or vice versa.
On server1 create the file /etc/keepalived/reservedip.sh which contains
#!/bin/sh
curl -X POST \
  -H "Content-Type: application/json" \
  -H "Authorization: Bearer dop_v1_2ecff269c49c10f7df5a02bee8f7ee85bd14ec0352ade4538602a8ffb0d69dxx" \
  -d '{"type":"assign","droplet_id":473762516}' \
  "https://api.digitalocean.com/v2/reserved_ips/134.209.131.225/actions"
While on server2 one creates the file /etc/keepalived/reservedip.sh which contains
#!/bin/sh
curl -X POST \
  -H "Content-Type: application/json" \
  -H "Authorization: Bearer dop_v1_2ecff269c49c10f7df5a02bee8f7ee85bd14ec0352ade4538602a8ffb0d69dxx" \
  -d '{"type":"assign","droplet_id":473762517}' \
  "https://api.digitalocean.com/v2/reserved_ips/134.209.131.225/actions"
NOTE: Change the API-key, droplet_id and reserverd_ips values according to your resources.
Don’t forget to make the script executable with the command
chmod +x /etc/keepalived/reservedip.sh
Keepalived Configuration
on server1 modify the file /etc/keepalived/keepalived.conf
Fill it with the following configuration
vrrp_script chk_apache2 {
    script "pgrep apache2"
    interval 2
}

vrrp_instance VI_1 {
    interface eth1
    state MASTER
    priority 200

    virtual_router_id 33
    unicast_src_ip 10.116.0.3
    unicast_peer {
        10.116.0.2
    }

    authentication {
        auth_type PASS
        auth_pass Passw0rd123
    }

    track_script {
        chk_apache2
    }

    notify_master /etc/keepalived/reservedip.sh
}
on server2 modify the /etc/keepalived/keepalived.conf file with the following configuration
vrrp_script chk_apache2 {
    script "pgrep apache2"
    interval 2
}

vrrp_instance VI_1 {
    interface eth1
    state BACKUP
    priority 100

    virtual_router_id 33
    unicast_src_ip 10.116.0.2
    unicast_peer {
        10.116.0.3
    }

    authentication {
        auth_type PASS
        auth_pass Passw0rd123
    }

    track_script {
        chk_apache2
    }

    notify_master /etc/keepalived/reservedip.sh
}
Testing
Install Apache2 on both servers
sudo apt install apache2
Then edit /var/www/html/index.html
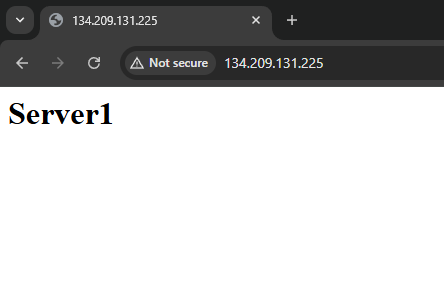
On server1 fill in the html code
<h1>Server1</h1>
on server2 fill with html code
<h1>Server2</h1>
Restart keepalived on both server
sudo systemctl restart keepalived
Keepalived should already be working correctly. when we open the reserved IP in the browser it will appear as in the picture.
Then we try to turn off server1 or we turn off apache2 on server one, then the reserved IP will automatically move to server2 and when we open the reserved IP in the browser, the image will appear as below
